Let’s Encryptを利用してSSLサーバー証明書を取得しました。取得した際の環境は以下です。
CentOS 7.4 + Apache 2.4.6
なお、Apacheにはバーチャルホストが設定してあって、SSLサーバー証明書の取得の作業はrootユーザで行います。
1. firewalldの停止
証明書取得の際、Let’s Encryptのサーバーと通信を行うためfirewalldは停止しておきます。80番ポート、443番ポートを通過させる設定になっていればfirewalldの停止は不要です。
firewalldの停止
# systemctl stop firewalld
firewalldの停止の確認
# systemctl is-active firewalld
「unknown」と表示されれば停止してます。起動している場合は「active」と表示されます。
2. mod_sslのインストール
/etc/httpd/conf.d 配下にssl.confがないことを確認します(あったらすでにmod_sslはインストール済みです)。
mod_sslのインストール
# yum install mod_ssl
インストールが完了すると、以下の2ファイルができます。
/etc/httpd/conf.d/ssl.conf
/etc/httpd/conf.modules.d/00-ssl.conf
mod_sslを有効にするためApacheを再起動します。
Apacheの再起動
# systemctl restart httpd
Apacheの起動の確認
# systemctl is-active httpd
「active」と表示されていることを確認します。
[広告]
![]()
3. certbotのインストール
Let’s EncryptでSSLサーバー証明書を取得してくるプログラムは「certbot」です。これをインストールします。certbotはepelリポジトリにあるため、まずepelリポジトリのインストールを行います。
epelリポジトリのインストール
# yum install epel-release
epelリポジトリのインストールができたら、certbot本体とcertbot用のApacheのプラグインをインストールします。ここで、プラグインのほうが以下の2種類があるようで、どちらのものが使用されるのか先に確認を行います。
certbot用のApacheのプラグイン
・python-certbot-apache
・python2-certbot-apache
どちらのプラグインが使用されるのか確認する。
# yum search certbot
以下が実行したときのログです。赤線部分を見ることでどちらかわかります。
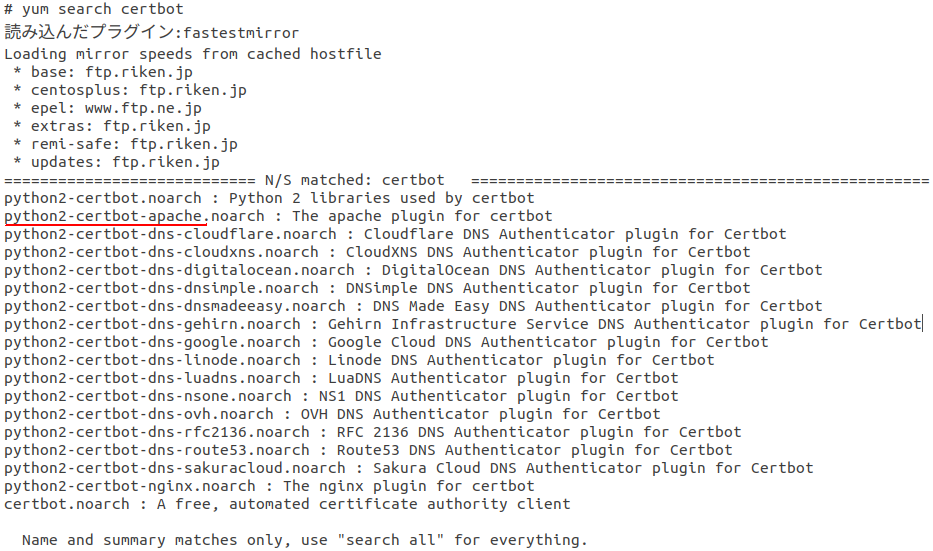
僕の環境ではpython2-certbot-apacheが使われるようなので、これとcertbot本体をインストールします。
certbot本体のインストール
# yum install certbot
プラグインのインストール
# yum install python2-certbot-apache
念の為、インストールの結果を確認しておきます。
インストール後の確認
# yum list installed | grep certbot
僕の環境では、以下のようになりました。

certbotのインストール先を見ておきます。
配置先の確認
# which certbot
/bin 配下に置かれているようです。
[広告]
![]()
4. SSLサーバー証明書の発行
SSLサーバー証明書の発行は以下のコマンドで実行します。
SSLサーバー証明書の発行
# certbot certonly --webroot -w /var/www/html/example -d example.com -d www.example.com
コマンドの説明をしておくと「/var/www/html/example」はドキュメントルートになりますので自分の環境に合わせて書き換えてください。また「-d」オプションですが証明書を取得するドメイン名を指定します。上記の例だと「example.com」および「www.example.com」の2つに対して証明書を取得するようにしています。ドメイン名についても自分のドメインにあわせて書き換えてください。
なお、certbotコマンドを実行する前にドメインの名前解決ができるようにしておいてください(DNSで名前解決できるようにしておく)。それをしておかないとcertbot実行時にエラーになってしまいますので。
certbotコマンドを実行すると以下の質問を受けますので、内容を確認して入力をしてください。
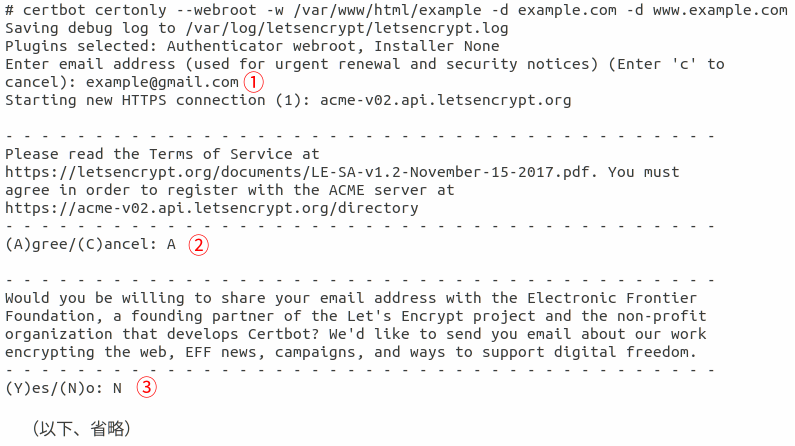
①連作先のEmailアドレスを入力します。
②規約に同意するかどうかを選びます。「A」は同意です。
③Let’s EncryptパートナーにEmailアドレスを公開するかどうかを選びます。
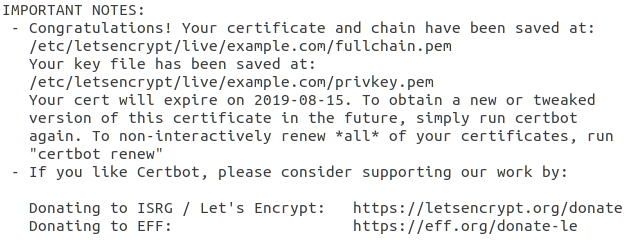
証明書の発行が問題なくできれば、以下のメッセージが表示されます。
CentOS 6 の場合だと、Let’s Encryptがhttpd.confやssl.confの書き換えを行って options-ssl-apache.conf を自動生成したりするのですが、CentOS 7 の場合だとhttpd.confやssl.confの書き換えはまったく行われていませんでした。options-ssl-apache.conf もありませんでした。
SSLサーバー証明書ですが、以下の場所にできています。
SSLサーバー証明書の格納先(シンボリックリンク)
/etc/letsencrypt/live/example.com
「example.com」はドメイン名なので自分の環境に合わせて読み替えてください。なお、ここにできているものはシンボリックリンクで実体は別の場所(以下)となります。
SSLサーバー証明書の実体
/etc/letsencrypt/archive/example.com
この証明書の場所をssl.confに記載しておくのですが必要なものは以下となります。fullchain.pemは使いません。
サーバ証明書(公開鍵)
SSLCertificateFile・・・/etc/letsencrypt/live/ドメイン名/cert.pem
秘密鍵
SSLCertificateKeyFile・・・/etc/letsencrypt/live/ドメイン名/privkey.pem
中間証明書
SSLCertificateChainFile・・・/etc/letsencrypt/live/ドメイン名/chain.pem
[広告]
![]()
5. ssl.conf、httpd.confの修正
ssl.confの書き換えを行います。すでに80番ポートでバーチャルホストを設定していたものとして、ssl.confの修正内容は以下となります。「example」の部分は自分の環境に合わせて書き換えてください。
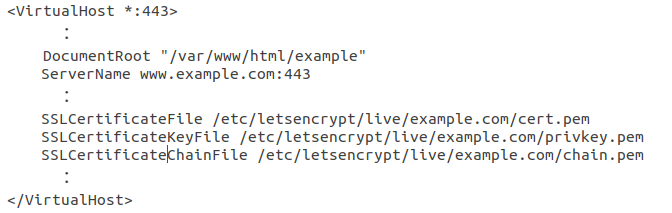
①VirtualHostタグの修正
<VirtualHost _default_:443>
↓
<VirtualHost *:443>
②ドキュメントルートの追加
DocumentRoot “/var/www/html/example”
③ServerNameの追加
ServerName www.example.com:443
④証明書のパスの追加
SSLCertificateFile /etc/letsencrypt/live/example.com/cert.pem
SSLCertificateKeyFile /etc/letsencrypt/live/example.com/privkey.pem
SSLCertificateChainFile /etc/letsencrypt/live/example.com/chain.pem
①〜④を反映させたssl.confの内容
また、80番ポートにアクセスしてきた場合に443番ポートにリダイレクトさせる設定もしておきます。こちらはhttpd.confのVirtualHostタグに以下の情報を追加します。
RewriteEngine on
RewriteCond %{SERVER_NAME} =www.example.com
RewriteRule ^ https://%{SERVER_NAME}%{REQUEST_URI} [L,NE,R=permanent]
リダイレクトを反映させたhttpd.confの内容

これで設定は終わりです。Apacheを再起動します。
Apacheの再起動
# systemctl restart httpd
ブラウザでアクセスしてみてください。URLの欄に鍵マークが表示されます。